UE4 TimelineComponent c++.
언리얼에는 Timeline이라는 기능이 있다.
일반적인 블루프린트 기능으로는 해당 타임라인을 누르면 트랙이 추가되고 여러 트랙으로 움직일 수 있다는 걸 알 수 있다.
하지만 c++에서 기능을 구현하기 위해서는 총 두 가지의 방법이 있다.
1. TimelineCompoent를 만들어 사용하기.
2. 일반적인 각각의 Timeline을 만들어 사용하기.
먼저 Component를 생성해서 사용해보기로 한다.
UTimelineComponent
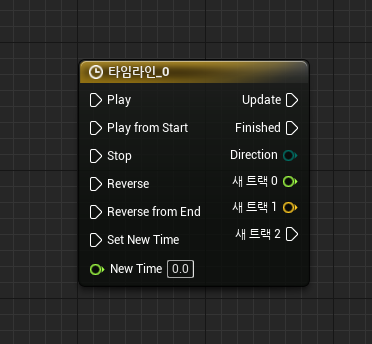
이런식으로 여러가지 트랙의 이름을 지정하여 한 번에 Play하여 동시에 작동할 수 있는 장점이 있지만 지금 코드는 하나만 지정하여 실행할 것이다.
예로는 움직이는 Platform을 작성하는 코드이다.
.h
protected:
	AMovingPlatform();

	virtual void BeginPlay() override;

	virtual void Tick( float DeltaSeconds ) override;

protected:
	//타임라인에 붙일 바인딩 함수.
	UFUNCTION()
	void DirectionMovingFloat(float value);
	UFUNCTION()
	void FinishedMovingFloat();

	//트리거 다이나믹 함수.
	UFUNCTION()
	void BeginOverlap(UPrimitiveComponent* OverlappedComponent, AActor* OtherActor, UPrimitiveComponent* OtherComp, int32 OtherBodyIndex, bool bFromSweep, const FHitResult& SweepResult);
	UFUNCTION()
	void EndOverlap(UPrimitiveComponent* OverlappedComponent, AActor* OtherActor, UPrimitiveComponent* OtherComp, int32 OtherBodyIndex);

public:
	UPROPERTY(EditAnywhere, BlueprintReadWrite, Category = "Mesh")		//기본 메시
	class UStaticMeshComponent* Mesh;
	UPROPERTY(EditAnywhere, BlueprintReadWrite, Category = "Mesh")		//버튼 메시
	class UStaticMeshComponent* Button;

	UPROPERTY(EditAnywhere, BlueprintReadWrite, Category = "Collision")	//트리거
	class UBoxComponent* Trigger;

	UPROPERTY(EditAnywhere, BlueprintReadWrite, Category = "Timeline")	//타임라인 컴포넌트
	class UTimelineComponent* Timeline;

	UPROPERTY(EditAnywhere, BlueprintReadWrite, Category = "Timeline")	//타임라인에 사용할 커브(float)
	class UCurveFloat* MovingfCurve;

private:
	FOnTimelineFloat InterpMovingFloat;				//타임라인에 적용할 지정변수(Constructor에서 지정하기 때문에 굳이 헤더파일에서 선언 안해도 된다).
	FOnTimelineEvent InterpMovingFinished;			//이하 동문.

	FVector StartLocation;						//시작 위치
	FVector EndLocation;						//도착 위치

	//상황에 따른 상태변수들.
	bool bPressedButton = false;
	bool bMoving = false;
	bool bReverseMoving = false;
.cpp
#include "Components/TimelineComponent.h"


AMovingPlatform::AMovingPlatform()
{
	PrimaryActorTick.bCanEverTick = true;	//Timeline을 사용하기 위해선 무조건 true로 설정해야 함.

	//그외 생성.
	Mesh = CreateDefaultSubobject<UStaticMeshComponent>(TEXT("Mesh"));
	Mesh->SetupAttachment(Billboard);

	Button = CreateDefaultSubobject<UStaticMeshComponent>(TEXT("Button"));
	Button->SetupAttachment(Mesh);

	Trigger = CreateDefaultSubobject<UBoxComponent>(TEXT("Trigger"));
	Trigger->SetupAttachment(Button);
	Trigger->OnComponentBeginOverlap.AddDynamic(this, &AMovingPlatform::BeginOverlap);
	Trigger->OnComponentEndOverlap.AddDynamic(this, &AMovingPlatform::EndOverlap);

	//타임라인 생성.
	Timeline = CreateDefaultSubobject<UTimelineComponent>(TEXT("Timeline"));

	InterpMovingFloat.BindUFunction(this, TEXT("DirectionMovingFloat"));		//Float 라는 변수에 float값을 받는 함수를 선언해야 바인딩이 가능함(예 : 함수이름(float value)).
	InterpMovingFinished.BindUFunction(this, TEXT("FinishedMovingFloat"));		//말 그대로 Finished는 Start이후 끝에 도착하면 호출하는 함수로 인자값은 없어야 함.
}

void AMovingPlatform::BeginPlay()
{
	Super::BeginPlay();

	//생성중에 Bind한 변수들을 TimelineComponent에 추가해줌.
	if (MovingfCurve)
	{
		Timeline->AddInterpFloat(MovingfCurve, InterpMovingFloat, TEXT("Alpha"));	//Float이벤트 변수를 Alpha라는 이름으로 Track에 추가함.
		Timeline->SetTimelineFinishedFunc(InterpMovingFinished);					//Finished이벤트 변수를 추가함.

		Timeline->SetLooping(false);				//반복 안함.
		Timeline->SetIgnoreTimeDilation(true);		//

		//위치 지정.
		StartLocation = GetActorLocation();
		EndLocation = GetActorLocation() + GetActorUpVector() * 1000.f;
	}
}

//Float변수 바인딩할 함수.
void AMovingPlatform::DirectionMovingFloat(float value)
{
	SetActorLocation(bReverseMoving ?
		FMath::Lerp(EndLocation, StartLocation, value) :
		FMath::Lerp(StartLocation, EndLocation, value));
}

//Finished변수 바인딩할 함수.
void AMovingPlatform::FinishedMovingFloat()
{
	TArray<AActor*> OverlapActors;
	Trigger->GetOverlappingActors(OverlapActors);
	bReverseMoving = bReverseMoving ? false : true;
	bMoving = false;

	for (const auto& Chr : OverlapActors)
	{
		if(Cast<ACharacterBase>(Chr)) return;
	}
	bPressedButton = false;
}

//Trigger Begin//
void AMovingPlatform::BeginOverlap(UPrimitiveComponent* OverlappedComponent, AActor* OtherActor, UPrimitiveComponent* OtherComp, int32 OtherBodyIndex, bool bFromSweep, const FHitResult& SweepResult)
{
	if (!bMoving)
	{
		if (GetVelocity().Size() <= 0.f)
		{
			if (Cast<ACharacterBase>(OtherActor))
			{
				bPressedButton = true;
				bMoving = true;
				Timeline->PlayFromStart();

				GEngine->AddOnScreenDebugMessage(-1,3.f,FColor::White,__FUNCTION__);
			}
		}
	}
}

//Trigger End//
void AMovingPlatform::EndOverlap(UPrimitiveComponent* OverlappedComponent, AActor* OtherActor, UPrimitiveComponent* OtherComp, int32 OtherBodyIndex)
{
	if (GetVelocity().Size() <= 0.f)
	{
		if (Cast<ACharacterBase>(OtherActor))
		{
			bPressedButton = false;

			GEngine->AddOnScreenDebugMessage(-1,3.f,FColor::White,__FUNCTION__);
		}
	}
}
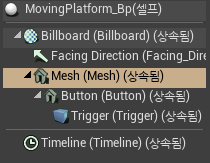
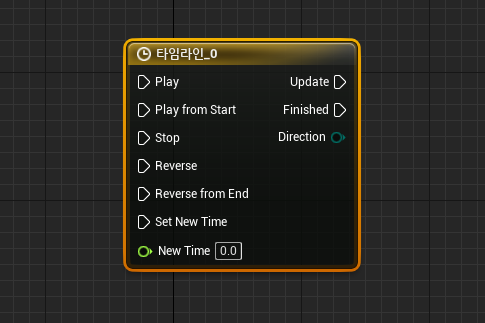
위와 같이 빌드하고 블루프린트타입으로 생성하면 아래와 같이 Timeline이라는 Component가 에디터창에 생성된걸 볼 수 있다.
이 후 설정할 것은 Curve이면 해당 코드는 Float로 설정하여 지정하기 때문에 CurveFloat를 만들어서 지정해준다(CurveFloat, CurveLinearColor, CurveVector) 이런식으로 존재 한다.
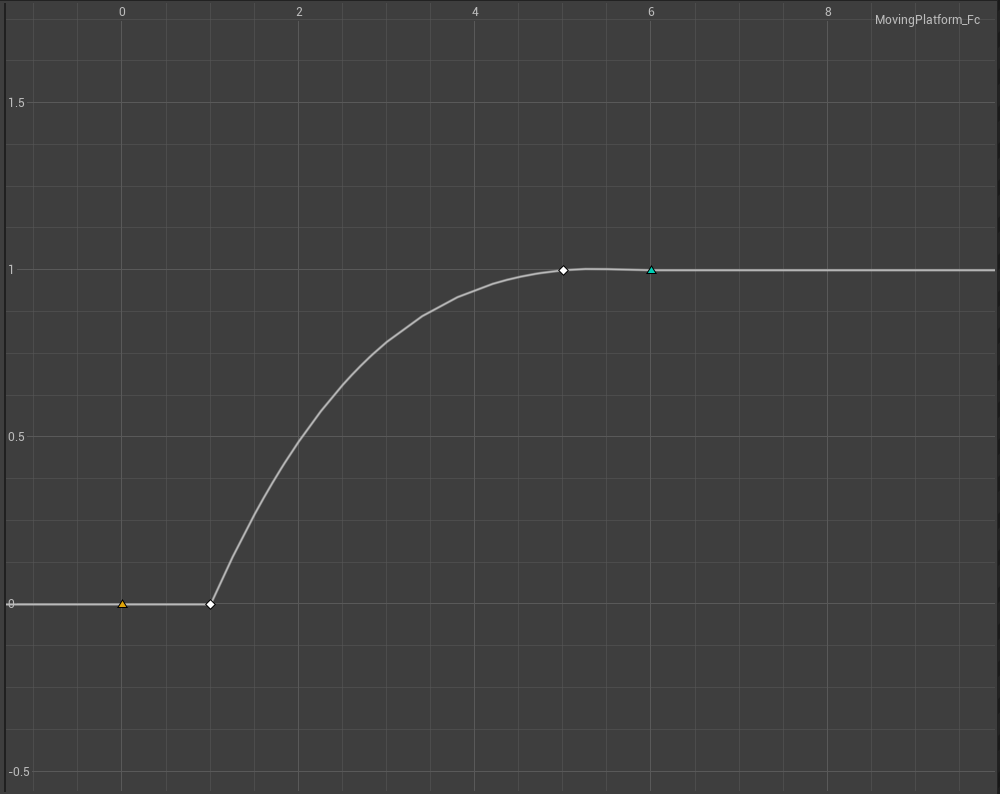
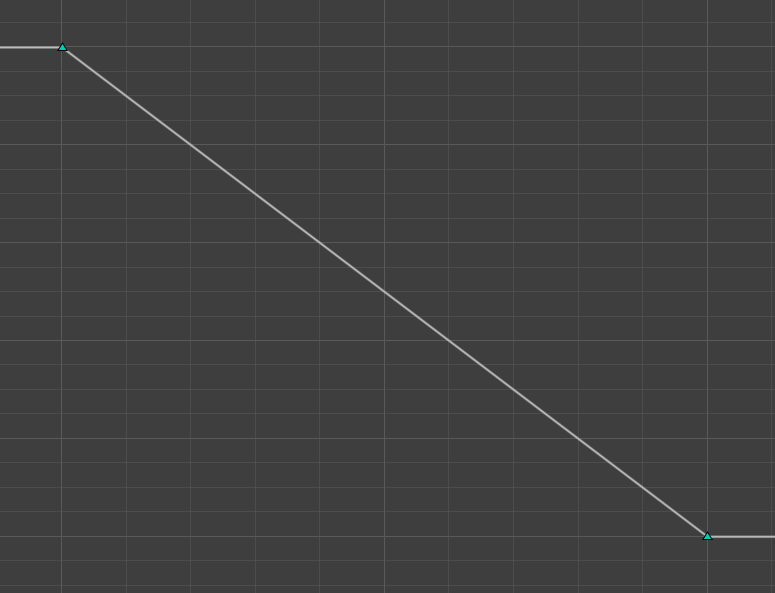
좀 더 자연스럽게 표현하기 위해 키를 추가해 지연을 줌.
실제로 움직이는 영상을 맨 아래 결과에서 보여줄 것이다.
UTimelineComponent
TimelineComponent holds a series of events, floats, vectors or colors with associated keyframes.
docs.unrealengine.com
FTimeline
이번에는 캐릭터가 사망했을때 메쉬가 Fadeout되는 효과를 넣을 것이다.
.h
#include "Components/TimeLineComponent.h"
UFUNCTION()
void Fadeout();
UFUNCTION()
void TimlineFadeout(float Value);
UPROPERTY(EditAnywhere, BlueprintReadOnly, Category = "Timeline")
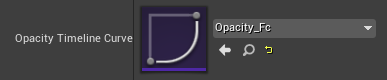
UCurveFloat* OpacityTimelineCurve;
FTimeline OpacityTimeline;.cpp
void ACharacterBase::Tick(float DeltaSeconds)
{
	Super::Tick(DeltaSeconds);

	OpacityTimeline.TickTimeline(DeltaSeconds);		//FTimeline같은 경우에는 tick을 받아야 한다(Component는 자체 Tick 있기때문에 상관이 없지만, FTimeline는 개별의 함수이기 때문에 설정해줘야한다).
}

//죽었을 때 호출할 함수.
void ACharacterBase::Fadeout()
{
	if (OpacityTimelineCurve)
	{
		FOnTimelineFloat FadeoutFunction;
		FadeoutFunction.BindUFunction(this, FName("TimlineFadeout"));
		OpacityTimeline.AddInterpFloat(OpacityTimelineCurve, FadeoutFunction);

		OpacityTimeline.PlayFromStart();
	}
}

//Bind할 함수.
void ACharacterBase::TimlineFadeout(float Value)
{
	if(!GetEffectComponent()) return;

	//GEngine->AddOnScreenDebugMessage(-1, 3.f, FColor::Yellow, __FUNCTION__);
	const TCHAR* Path = *GetEffectComponent()->GetBodyMeshPath();
	UMaterialInterface* Material = LoadObject<UMaterialInterface>(nullptr, Path);
	UMaterialInstanceDynamic* DynamicMaterial = GetMesh()->CreateDynamicMaterialInstance(0, Material);

	if (DynamicMaterial)
	{
		GetEffectComponent()->AllMeshFadeout(Value);
	}
}
위에 Fadeout되는 기능은 어떻게 구현 하는지는 아래 링크에 미리 작성해둔 c++ Material 접급하기에서 확인 해주시길 바랍니다.
UE4 c++ Material 접근하기.
게임을 제작하다보면 해당 폰의 메시가 Fadeout되면서 사라지는 것도 연출하고 싶고 아니면 색깔을 변경하여 다른 느낌을 주고 싶을 것이다. 그래서 지금은 material을 적용방법은 안다고 가정하겠
codakcoo.tistory.com
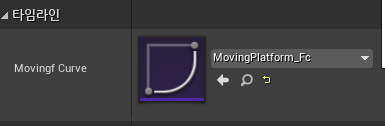
그리고 다음과 똑같이 Curve를 생성 후 지정해주면 완성이다.